Pages

Friday, December 23, 2011

Family Fun Night- Gingerbread

We have started doing family fun night in our house.  We try to do something together as a family whether it is just dinner out or something a little more involved.  Last week we did a gingerbread theme.  We started by making gingerbread man cookies.
 The boys helped cut out all the men and put them on the cookie sheet.
 While they were baking we read "The Gingerbread Man".
 Once they were done we decorated the cookies with frosting, sprinkles, mini chocolate chips and M&M's.
 My youngest son got a little carried away.
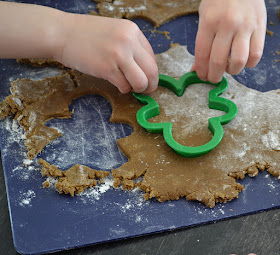
 After the cookie decorating we made Gingerbread play dough.  It smells just like gingerbread cookies but doesn't taste very good.  We used cookie cutters to cut out fun shapes.  This kept the boys busy for quite awhile.
 Some how they ended up on the table.  Since it was family fun night I decided to let it go and let them have fun.
 The last thing we did was decorate gingerbread houses.
 Each boy took their time and made their house very special.
We all really enjoyed our night together and all look forward to our next family fun night together.

Thursday, December 22, 2011

Santa's Belly Pot

While trying to come up with a gift for my sons teacher this year I came up with this Santa Belly Pot.  It was something that would be inexpensive and easy for my son to do.  We started with a clay flower pot and some paint.  My son painted the whole thing red.  After it dried, he (with my help) painted the "belt" black.  We then used a hot glue gun to stick on the "belt buckle".
I had made some homemade candy the day before so we wrapped it up and stuck it inside along with an ornament my son made. 
I love how easy the gift was and that my son was able to do most of the work himself.  Homemade gifts are always my favorite.

Wednesday, December 21, 2011

My Christmas Mantle

You may remember the post from a couple weeks ago where we installed our new mantle.  It is definitely a great focal point in our house.  So much so that I am having a hard time decorating it.  After looking at it for a couple weeks this is what I have come up with.  I am not 100% satisfied with it but it will work for now.  Hopefully over the next year I will be able to come up with something that I really love.  I added our new sparkly stocking holders, 2 small nutcrackers and two glittery trees to the ends.  I filled two glass apothecary jars filled with ornaments and my ornament frame to the center.

Tuesday, December 20, 2011

Reindeer Food

One of my boys favorite Christmas traditions is making reindeer food.  On Christmas Eve we sprinkle it all over the yard.  The glitter is supposed to reflect off the moon to help the reindeer find our house.  While Santa is delivering the gifts the reindeer have a tasty treat to enjoy.
 You will need:
oatmeal
glitter
bowls

 Put some oatmeal in a bowl and add the glitter.  We mixed it together and then poured it in a little tin pail.
It is all ready to go for Christmas Eve.

Thursday, December 8, 2011

A Reason to Stockpile

Over the years I have been asked numerous times why I stockpile.  I always say the same reason, to help my family save money.  Well yesterday a new reason came about.  One of my best friends has a co-worker who is having a rough time this year.  She does not have the money to give her kids a Christmas meal let alone a special Christmas.  Because of this, the father was threatening to take them from her so the kids wouldn't do without.  When I got the email from my friend to help her co-worker, I jumped right on it.  Not only would I be able to help out but I would also be able to teach my kids a valuable lesson in giving.

We started in by going through our toy stockpile. This is where I keep toys on hand to use as gifts for birthday parties.  Next we hit up the craft room and filled a bag with crayons, pencils, construction paper and much more.  We also gave a bag of food and toiletries.  The kids got so excited that they wanted to start giving away their own toys.  I loved seeing how willing they were to help out other kids in need.

While I don't know this family and will probably never meet them, it is nice knowing that I was able to help them out a little.  Everyone deserves to have a special Christmas.

Wednesday, December 7, 2011

Cookie Dough Fudge

It is time again for the Crazy Cooking Challenge over at Moms Crazy Cooking.  This month's theme is FUDGE!!  I have tried to make fudge in the past and was not successful.  It would never set up and was kind of runny.  I was very happy when this recipe turned out perfectly and tastes amazing.  I have to pace myself so I don't eat it all in one sitting.


 I chose Cookie Dough Fudge from Cookies & Cups.

Ingredients:
1 c. butter, softened
1 c. packed light brown sugar
1/2 c. granulated sugar
4 Tbsp. milk
2 tsp. vanilla extract
1 t. salt
2 c. all-purpose flour
1 1/2c. mini semi-sweet chocolate chips
2 cups semi sweet chocolate chips
1 cup milk chocolate chips
1 (15 oz) can Sweetened Condensed Milk

Combine first 5 ingredients in a mixing bowl and cream together. Add flour and stir until combined. Stir in chocolate chips.

Form your cookie dough into marble sized balls.
Place on a waxed paper lined baking sheet.
Freeze for at least 15 minutes. The longer the better, so it doesn’t melt when you add it to the fudge.

Butter the bottom and sides of an 8×8 pan.
In a medium saucepan over low heat melt the sweetened condensed milk and chips together.
Stirring continuously.


When chocolate is melted remove from heat.
Remove your cookie dough from the freezer and carefully fold into your fudge.

Spread immediately in the pan.
Chill for at least an hour.

Cut into squares and serve.
Enjoy!
Photobucket

Tuesday, December 6, 2011

Pepperoni Pizza Puffs

Lately I have been struggling with meals.  It seems if I spend a lot of time in the kitchen making a more involved meal my boys will complain and not eat.  After a couple months of this, I have come to the conclusion that I need to stick with quick, simple, easy to eat meals.  My boys tend to eat them better and are much more excited about meal times.  One meal I make often is homemade pizza.  It is easy and well received.  When I came across this pizza puffs recipe here, I knew this would be a big hit.  It is so good I need to start making a double batch so we have some leftover.
Ingredients:
3/4 cup flour
3/4 tsp baking powder
1 Tbsp Italian seasoning
pinch of salt
pinch of red pepper flakes-optional
3/4 cup whole milk
1 egg, lightly beaten
1 cup shredded mozzarella cheese
1/4 cup grated Parmesan cheese
1 cup cubed pepperoni
1/2 cup pizza sauce

1.  Preheat the oven to 375 degrees.  Grease a 24-cup mini muffin pan.  In a large bowl whisk together the flour, baking powder, Italian seasoning, salt and red pepper flakes.  Whisk in milk and egg.  Stir in the mozzarella cheese, Parmesan, and pepperoni; let stand for 10 minutes.

2. Stir the batter and divide among the mini muffin cups.  Bake until puffed and golden, 20 - 25 minutes.

3.  Meanwhile, microwave the pizza sauce until warmed through.  Serve the puffs with the pizza sauce for dipping.

Monday, December 5, 2011

Ornament Frame

After Christmas last year I bought a bunch of ornaments on clearance.  I have had a lot of fun this Christmas coming up with fun ways to incorporate the ornaments in my decorating.  I saw an idea similar to this on Pinterest.  I didn't pin it so not sure where the idea came from...sorry.
 I started out with an old picture frame I found at a yard sale over the summer.  I primed and then spray painted it a flat black.  The ornaments I planned to use were shiny so I used flat paint so they wouldn't compete.
 I used the painted frame, 4 ornaments, white ribbon and an "A" I found in the Dollar Spot at Target.
 I dismantled the back of the frame and took out all the screws and moved them to the top.  If I had a staple gun (which is on my Christmas list) I would have stapled things on instead of using the screws.
 I cut the ribbon and played around with different lengths until I had it the way I wanted.
 I stuck the ribbon under the screws and then tightened them down, then cut off the extra ribbon.
It is now sitting on my mantle until I find where I want to hang it. 
This was an simple project that cost less then $2 to make.


Linked up to Ginger Snap Crafts!

Saturday, December 3, 2011

Save Mart cheap hot dogs

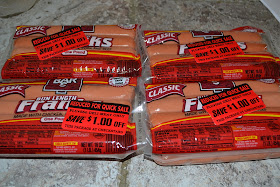
While shopping at Save Mart keep a look out for these cheap hot dogs.  Bar S hot dogs on sale 4/$5 with a $1 quick sale sticker on them.  I got them for .25 each and stuck them in the freezer for later.  The best buy date was still a week away so these made for a very thrifty deal.

Monday, November 28, 2011

New Mantle

We recently bought a new house and the one thing that I really wanted to change was the fireplace.  It looked extremely plain and needed a mantle.  After searching around we found a mantle we thought would look great.  It arrived on Saturday and we quickly installed it.  I just love it and can't wait to decorate it for Christmas.

Before the Mantle
 With the new Mantle

Friday, November 18, 2011

Mickey Mouse's Birthday

Today is Mickey Mouse's Birthday.  We had a playdate at a friends house complete with Mickey ears, grilled cheese and sugar cookies.

To make the ears, take a headband, cut out black felt the width of the headband and hot glue it on.  Then trace around a glass onto black foam and cut out the circles.  Glue the circles onto the headband using hot glue.  There you have it, a quick and easy set of Mickey Mouse ears.
 To make the Mickey grilled cheese just use a cookie cutter and cut out the mickey shape.  Spread butter on one side and put on a griddle to toast.  Add cheese and let partially melt.  The cheese wasn't fully melted when the bottom was toasted so we put it in the microwave for a few seconds.
Happy Birthday Mickey Mouse!

Monday, November 14, 2011

Crafting with your kids: We are thankful for...

My oldest son has been on fall break for the past two weeks.  To say he is driving me insane is an understatement.  He is constantly board and begging for things to do.  In an effort to keep him busy I have been trying to do one craft a day with him.  Today we made a thankful tree.
My son used a punch to cut a bunch of tiny leaves out of yellow, orange and red construction paper.  I used brown paper and cut out a tree shape.  We then used some cloth leaves I had on hand and my son glued them onto the tree.  On each leaf we wrote something we are thankful for such as family friends, Jesus and our pets.

This was a fun and easy craft.  It also gave us a chance to think about the many things that we are thankful for on a daily basis.

Sunday, November 13, 2011

Menu Plan- November 13th - 19th

We have a lot of food in our pantry and fridge so I decided to make up our menu plan based on things we already had.  I just had a few items to pick up to complete the meals and was able to spend the rest of our grocery money on stock up sale items. 

I found a recipe on Pinterest that I can't wait to try so I added it to my menu plan.  Aside from that it is all things we have had in the past and one recipe we didn't get to last week.

Dinners:
Creamy Chicken Piccata, salad
homemade calzone
tacos
chicken and artichoke
chicken meal from Raleys (free with a coupon)
breakfast- ham, eggs, hash browns
left overs

Thursday, November 10, 2011

Leaf Turkey

My boys and I went for a walk today and collected some leaves that had fallen from the trees.  We saw a craft somewhere (not sure where) that was similar and wanted to make one of our own.  We live in a newer neighborhood with small trees so the leaves aren't as nice as I had hoped but they worked just fine.
 You will need construction paper (white, brown, orange and red), googly eyes, yellow pipe cleaner, leaves, scissors, glue and two circles to trace around.
 Start by tracing around the circles and cut them out.  One will be the body and one the head.
 On the small circle glue on the googly eyes, a beak and a waddle.  My son glued his a little lower then it was supposed to be.
 Glue the leaves to the white construction paper.
 Glue on the big body circle.
Attach the small head circle then use the yellow pipe cleaners to make feet.
My boys really enjoyed this project.  My 5 year old did most of it himself and the two year old helped with all the gluing.

Carmelized Garlic Cheese Ball

At our recent Halloween Party I made this carmalized garlic cheese ball.  It is a great make ahead appetizer and can be altered for any holiday.  I served it with chips but it is also great with little slices of bread and veggies.

Caramelized Garlic Cheese Ball

  • 2 Tbsp butter
  • 2 Tbsp minced garlic
  • 1 tsp sugar
  • 1 8 oz cream cheese, softened
  • 1/4 cup butter, softened
  • 8 oz shredded sharp cheddar cheese
  • 1/4 cup sliced green onion (optional)
  • 1/4 tsp salt
  • 1/2 cup finely crushed cheese flavored crackers
Melt 2 Tbsp butter in skillet, add garlic and sugar.
Cook over medium high heat stirring constantly until garlic starts to brown (3-5 minutes).
Combine garlic and all ingredients except cheese flavored crackers.
Beat on medium until creamy.
Shape into ball shape with hands.
Cover and refrigerate for 1 hours.
Place crushed crackers in a bowl, roll cheese ball in crackers pressing firmly to coat.
Cover and refrigerate 2 hours or overnight.
Serve with crackers and veggies.

Linking up to life as mom!

Wednesday, November 9, 2011

Crafting with your kids: All about me

One of my friends is hosting a play date called All about me.  We are unable to attend so I decided to do the project at home with my kids.  I wanted to make it simple and use things we already have so I used long sheets of drawing paper that I taped together.  This made it wide enough for my kids to lay on.  I had them lay on the paper and then drew around it.  Both moved a lot because "It tickled".
 Once their outline was traced they used crayons to draw faces and clothes.
 I weighed and measured them and wrote it on the paper.
My craft room was really cold so I couldn't get a good picture of my son without a funny face.

Tuesday, November 8, 2011

Target Halloween Clearance

I stopped by Target last night to pick up a few things and saw the Halloween stuff was 90%.  My boys have been playing dress up a lot lately so I picked up a bunch of costumes to add to their stash.  I also grabbed a few other things like marshmallows, treat bags and Pez.

Monday, November 7, 2011

Menu Plan- November 6th - 12th

I have been slacking on grocery shopping and cooking.  So much so that my husband asked me to please go shopping and make a meal plan.  Everytime I come up with something to cook we are missing 1-2 items, which leads to us eating out.  I decided to make things easy on myself this week and use my slow cooker for the majority of our meals.  My hope is that the meals will allow enough leftovers for him to take to lunch the following day.  He is getting really tired of peanut butter sandwiches.

Dinners:
Butternut Squash Soup & Rolls (from freezer)
Orange Chicken, Rice & Broccoli
Chili & Corn Bread
Chicken & Artichoke, Salad
Lasagna, Salad
Chicken & Dressing, Veggie
Eat Out

Now if I can just stick to my plan it will be a tasty week.

Friday, November 4, 2011

Crafting with you kids: Cloud Dough

It is snowing today which means we will likely be staying indoors.  In an effort to keep my boys busy we made cloud dough.  I have seen it made before using flour and baby oil (which I don't have) but found where canola oil can be substituted so we went with that.
 I used 8 cups of flour and one cup of canola oil.
 We mixed it all together.  My hands feel really soft now which is a plus.
 The boys have used baking cups, cars and now have a whole Hot Wheels track set up in the cloud dough.  This is messy but a lot of fun.